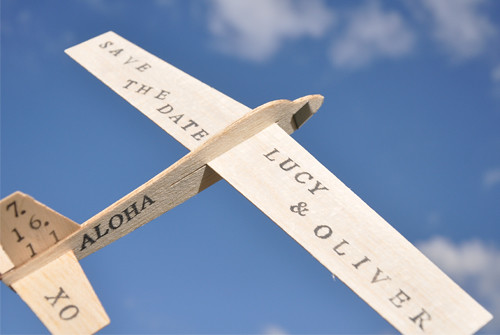
Hello my dears! Do I have a special treat for you today - A Luna and Chloe original design! Hopefully by the end of this post you will be flying high...he he. Okay, so I was talking to a friend recently about destination weddings, and it got me thinking...if I was having a destination wedding how would I do my Save the Date announcements. And in just a matter of seconds it hit me. I might be dating myself here (eek), but do you remember the balsa wood airplanes, or jet gliders that you would get from the store for $.50 or so? You would assemble them in seconds, and having them take flight all over the house or yard. My brother and I used to fly them down the staircase growing up when we lived in an old victorian home. However, me being the younger one, I usually was the one that had to go down and get them and bring them back up! Typical, no?
Anyhow, I put the two together (a destination wedding and jet gliders) and this is what I came up with...
I am OVER THE MOON about how they turned out! I purchased the jet glider for $1.00 at Michaels. And while it has writing on each side of the pieces, I just flipped them over and used the undersides. There was a small stamp on the underside that said where it was made, but with a little sandpaper it came right off. Ooh, and the sandpaper is fabulous for fixing a mistake if made. Just wait for the ink to dry before you sand off, and don't rub too hard. Now, I know exactly where to get the jet gliders without anything on them (granted they are shaped a little differently), but I couldn't justify spending over $30 and receiving over 30 of them, when I only need 4 for this project. Here are the supplies that are needed for making a Save The Date plane:
- Jet Glider
- Fine sandpaper (optional)
- Letter and Number stamps
- Stamp pad
I included some other items in the picture below that I used. However, you only need the four items above to actual make them.
All you really have to do is stamp...
I made a custom envelope for them, added a piece of chipboard to protect the plane from breaking in the mail, and then added some little details...
And voila! They are ready for take off...
Yet, don't think I stopped there...oh no! I tried to think of another, possibly eaiser way to use too. And here's is another option for you that I came up with...
For the banner you could either print it up (the easy way), or stamp it (a little more time consuming). Since I started with stamps, I figured I would continue with them!
I glued the twine and a very thin piece of chipboard that I cut to the back of the banner. I didn't want the paper to bend or fold, so this gives it some stability. Also, I glued one piece of twine to the top of the back of the plane and one piece to the bottom to attempt to keep the banner straight when flying through the air.
In talking with my sister the other day about my idea, which I knew she would love, she was ecstatic to say the least! She has a little boy (Baby Riley is what I call him, with the most fabulous red hair EVER) that is turning one soon. Well...guess what? Oh yes, these are perfect for a boy's birthday party...or a girl's too.
And even if you aren't having a destination wedding you can still use these if you love to travel, are a pilot of just for the fun of them!
There are so many ways to customize them too, and you could always use a colored stamp pad instead of black. And for those of you that love the idea....but don't want to make them yourselves, I am offering custom made Save the Dates or Invitations in my Etsy store if you are interested, as well as the little stitched heart on the tag. They will be available for purchase in my Etsy store come Monday, February 28th! ~ Ciao
...concept, design, styling & photography all by luna and chloe weddings
***
Both the airplane save the date and the stitched key tags are my ORIGINAL designs. PLEASE do not copy, and pass it off as your own! I am sharing with you how to make the airplane save the dates out of kindness, return the favor. Thank you bunches!


![I [Heart] Ebates](http://static.theblogfrog.com/p/ebates/badges/savvy_living_badge_expert.png)


